Is it Moral to Make Money?

If you’ve been in church any amount of time, you’ve heard it quoted:

“Money is the root of all evil!”

But is that what the Bible says? Let’s take a look.

Let’s break that down. 

First it says, “the love of money”. So money is not the problem. Loving money is. Why does God care if you love money or not? 

Well 1 John 4:8B says: “God is love.”  So we first see here that God is love. Our love and what we love is of utmost importance to God because God is love. He loves us and wants our love in return. 

Matthew 22:36-40 states that the first and greatest commandment is to “love the Lord thy God with all thy heart, and with all thy soul, and with all thy mind.” 

When we love money more than God, we are not fulfilling the greatest commandment.  It is about priorities. God wants to be FIRST in our lives above anything else. Anything short of that is idolatry. Anytime we put something before God, we have an idol in our life that needs to be destroyed. 

Next, it states that the “love of money is the root of all evil”. One of my kids asked me if this was truly true the other day. How can murder be caused by the love of money they asked? (Leave it to kids to push you to really study out the Scriptures!)  

Unless you’ve grown up on an island without internet or television, you’ve probably seen a few tv shows about police catching the bad guys. When the detectives are talking what do they always say about how to catch the bad guy? …. They say: “Follow the money!”.  Why? Because most times, that is what it comes down to. Jealousy, greed, wanting something we have not yet earned. The love of money. 

Next, the Bible says that the love of money leads to abandoning our faith. “Which while some coveted after, they have erred from the faith…”. 

The problem with loving money more than loving God is that it always leads to a decline in your Spiritual walk with God. 

What is faith? Faith is believing God. It is salvation. It is trusting God as your personal Savior. And when you get truly saved, you will end up doing a 180. What’s a 180? It’s when you were walking one way… living your life for yourself, living selfishly, living in sin, drinking, doing drugs, going to parties… and then God saves you… and you make a 180 degree turn and start walking the other direction. You start walking TOWARDS God. What does this look like? 

Well, I always tell the ladies in our church and our teen Sunday School class – you should want to be part of the 1% Club. The 1% Club is the club that consists of about 1% of Christians that do the 5 main things that keep you right with God. 

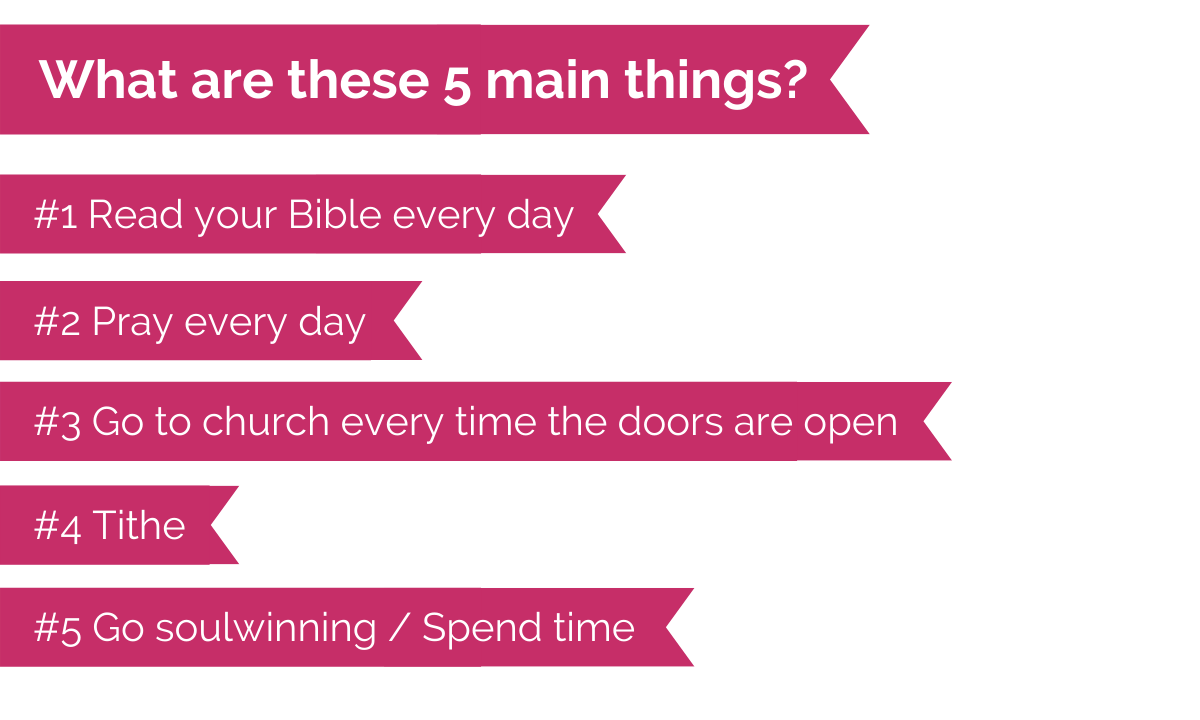
If you are a Christian and do those 5 things every single day – congrats! You are in the top 1% of Christians in the world. 🙂 

The problem with loving money is it stops you from doing those 5 main things. You get up in the morning and have to rush to work, to close a deal, to check your emails… so your Bible reading and prayer life suffers. 

You have a conference to attend or a sales meeting that can only happen on Sunday morning at 11am – right in the middle of church service… so you start to miss church – just this one time you tell yourself. 

In the Independent Baptist church we have a tradition to go out each Saturday morning and knock on doors and invite people to church. There is nothing in the Bible that says you have to go on Saturday morning to evangelize. But what is true, is that if something is not scheduled, it won’t get done.  When you are working 40-60+ hours per week to try to get ahead and grow in your career, it is very easy to justify not scheduling the time to purposefully go out and tell others the Good News – that Jesus died for them and that if they believe in HIM they can have eternal life – and a joyful life now! 

The love of money can even pull you out of church completely if you let it. I’ve seen many strong Christians that used to be faithful to church. They’d sit in the front. They’d sing with a smile on their face and joy in their heart. And then they got a job that pulled them out of church on Sunday’s. They always justify it and say… “I’ll be able to tithe more… It’s only for a little while”. That is how the devil works. So subtly. 

So can you be rich and love God? 

Yes!

There are many examples in the Bible where God blesses His people with financial rewards. 

Just look at King David! Some studies show that his net worth easily exceeded $200 billion dollars. But what did he do with all of that money? He gave. He gave materials for the construction and finishing of Jerusalems’s house of prayer. 

Then there is King Solomon. It is said that he received $40 billion in gold each year. Solomon also gave back to God. He was pivotal in the construction of the Temple. 

You can look at modern day stories as well. 

JC Penny who gave between 10-30%. His first store founded in 1902 was called the “Golden Rule Store”.

Sam Walton, founder of Wal-Mart, was a Sunday School teacher and contributed to his church. 

Acts 20:35B says: “It is more blessed to give than to receive.” 

When a young person is just getting started out in life and they don’t have anything to their name, this verse is hard to understand. They think, “No… I’d much rather have someone give me something! I’d much rather be on the receiving end!” 

When we first came to Mexico as missionaries we lived in Iguala, GRO. We did not have 2 pesos to rub together. 🙂 Literally. One time the guy that sells bottled water came by our apartment. He rides a bike and has about 10-15 jugs of water that he sells door to door. At the time, the water cost 10 pesos (about $1). We asked if he could “fiar en nosotros” … “trust us” for a week until we could pay him! We did not even have enough money for water at times! I’m not complaining – it was the most exciting time of our lives finally being married and serving in Mexico as missionaries! 

When someone gave us something – when they bought us pizza for dinner, or invited us out for tacos – we were thrilled! It was such a special treat! 

I am so thankful for those people that gave to us in our time of need. 

Now that we are in a different financial situation, there are other types of blessings.  We are blessed to be able to give. We can buy food to give away to those in need in our church each Sunday. We can take boxes of groceries to a pastor and see his little girls light up with joy when she sees the box of Choco Krispies. We can buy medicine for the families sick in our church.  We can sponsor students in our Christian school so that they have an opportunity for a better education and a completely changed life. We can give on a monthly basis towards missionaries in other countries and help support their work. 

It truly is more blessed to give than to receive. 

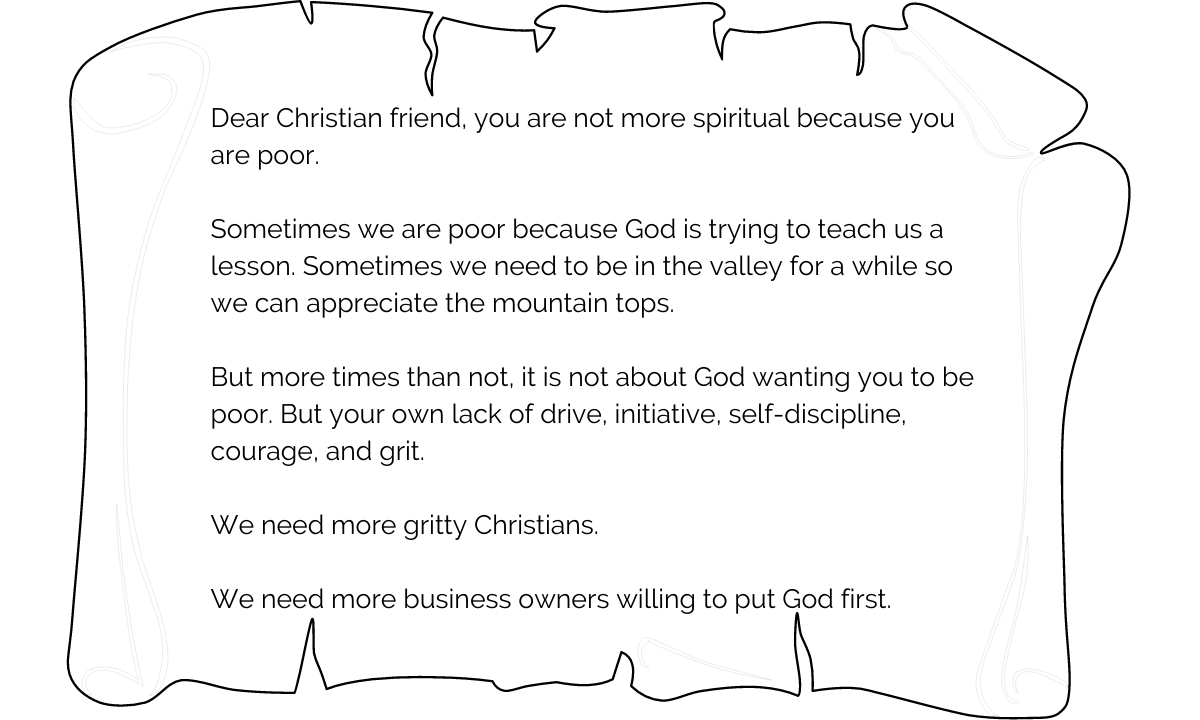
And that is what building a business is all about. 

It’s not about the money. The money does not matter. What matters is what can be done with the money. 

How many people can we help. How many lives can be changed. 

It’s all about balance. It’s about priorities. It is about putting God first and letting your business be something that serves you to allow you to serve God… not the other way around. 

How to Launch Your First Online Course!

Are you ready to create a course but don’t know where to start? Follow this simple process and you will get your course done in no time flat! 

Step 1: Define your Marketing Position 

Ever heard the story that if you have a day to cut down a tree you should spend 7 hours sharpening your ax and one hour cutting down the tree? That is exactly what this step is!

Before getting started creating 300+ power point slides and 20 fillable PDFs, make sure you identify WHO your course is for and what result (transformation) they are going to get or achieve after taking your course. Here are some questions you should be able to answer:

  • Who is our target audience?
  • Who is not our audience?
  • What are their hopes, desires, dreams?
  • What are their fears, frustrations, & pain points?
  • What results do they want? What transformation will your course give them?
  • Who are your competitors? 
  • What have they tried and why hasn’t it worked?
  • How can you solve the problem better?

Answer these questions in detail and everything else you do will be easier.

Step 2: Map Out Your Modules 

The biggest mistake in course creation is trying to teach too much.  You are an expert in your area and you have a burning desire to help people so naturally you want to give them all of the information they need to be successful. Unfortunately this is a losing proposition. If you give away too much information and create a 25 hour course, most people will never finish watching all of the videos, and even less will take action.

You can solve this by giving away just enough information to keep it high level, and use weekly live coaching calls to fill in the gaps. (Which can also be recorded, transcribed, and uploaded as bonus content to your members area!) 

A good structure I have found, is this: 

  • A course has 6 modules of about one hour each. 
  • Each module has 6 lessons of about 10 minutes each.

That means that a course will have about 6 hours total of content and it will be laid out in an easy to consume format! 

What I have found that is also very helpful, is to write out a bullet point for each lesson in a “sales language” format so that I can use those bullet points on the sales page. 

Step 3: Write Your Sales Page 

It may seem counter-intuitive, but the next step is not to record your course, but to write your sales page. This will help you to further narrow down what you are going to be teaching and make sure that the course you have in mind is actually an appealing offer. 

After writing your sales page you can add it to your site, let people know that it is currently closed but they can join the wait list, and start capturing leads. This is a great way to also gauge interest for a course before you go to all the work of building it!

Step 4: Record Your First Module or Pre-Training Material 

You don’t make money in draft mode! Get your first module done or pre-training material ready and then get ready to sell! If you are doing this for the first time and will be doing live coaching calls as you move through your course, you are going to be able to customize your training for your students. Each week let them know what you are going to be teaching the next week and ask them what their biggest questions are related to that topic. Guess what! You now have your lessons mapped out for you! Take their questions and incorporate them into your lessons and your content will create itself. 

Step 5: Time to Sell

Don’t let that course sit on your virtual shelf too long. Once you have done steps 1-4, get busy selling! 

What questions do you have about course creation? Let me know in the comments below!

The Guide to Instagram for Video Marketing

Instagram video marketing

You’ve probably heard of Instagram or are maybe even using it to share images. But did you know Instagram can also be used to create videos you can share. Instagram is fast and fun way to freely share the memorable moments in your life.

Instagram video lets you take a video and transform how it looks with several built in filter effects. You can instantly post those videos with your friends and family and to Facebook, Twitter, Flickr, Tumblr and Foursquare.

Instagram is an app available for both Android and iOS systems.

How to install Instagram

If you haven’t already installed Instagram, it just takes a few simple clicks.

Begin by going to Instagram.com. Download the Instagram app for your iPhone/iPad from the App Store or download if for your Android in Google Play. Click on the install button.

Once you have the app installed on your device, tap it to open. Register your account and fill out the profile. Click done.

How to Record a Video

You can begin recording video almost immediately after you download the app.

To record a video, tap the blue button at the bottom of the app and then tap the video button to switch from camera to video.

2-record

Press and hold the camera button to begin recording. When you are done recording lift your finger from the video button to stop recording.

Tap Next to add a filter and share your videos your videos. You can add your cover clip by moving the Choose Cover Frame slider to where you want it. Press the green arrow to save it.

Now you are ready to share your video.

Sharing

Sharing videos on Instagam doesn’t have to be with new videos. You can share videos that you’ve previously recorded on your phone.

Upload a video from your phone to Instagram, by tapping the camera icon at the bottom of the app on your phone. Tap the video camera icon to switch from camera to video.

Tap the box in the bottom-right corner to show your phone’s video album.  Choose the video you want to upload. (On the iPhone, you need to tap the Next at the top.)

Choose the 15-seconds of the video you want to share by putting your finger on the video strip along the bottom and them sliding it to the left. This lets you set where you clip starts playing.

Drag the blue slider bar across the top of the video strip to set where your video clip will end.

3-slider

Tap Add on the iPhone or the green next arrow at the top on the Android.

Sign into your social media account if needed, and click done.

For iPhone, you can combine more than one clip together to make a single 15 second video. Go back to your phone’s video album and repeat the steps or record a new clip from the app.

Marketing Idea

Use Instagram to create How-to tips and demos of your products. You’re an expert in your product or field. Show samples of your expertise to tease your audience into wanting to see more.

Get your audience excited and involved in your brand by offering them a contest to enter.

Add a Filter to Video

There are several filters you can use to make your videos stand out.

After your video is recorded, tap Next. There is Maven, Gingham, Ginza Skyline, Dogpach, Brooklyn, Moon, Helena, Asby, and Charmes available at this time. Select the one you like, tap Next to continue on to the share screen.

4-filter

Marketing Tip

Instagram videos can be up to 15 seconds long. In comparison to the Vine app which is only 6 seconds long, you can create a quick promotion that showcases different elements of your business such as a special offer, a new product, the footage from an upcoming event or even a live video of your tradeshow or conference booth.

Or how about showing the daily work life of your brand or business.

Short, 15 second bursts of video capture interest and hold short attention.

To get your point across in the brief videos while keeping your audience’s attention, focus on images and create quick, interesting headlines.

Miscellaneous Tips

Previous clips can be deleted by tapping the X and then tapping the trash can to confirm you want to delete.

Take multiple clips by lifting your finger off the record icon during the recording process. This pauses the recording. Tap and hold the button again when you are ready to move to the next clip.

The iPhone 4S and iPhone 5 come with the built in Cinema feature that allows you to stabilize your video after you have taken it.

Sound                                                                       

Sound can be set to play instantly or be turned off by default on your Instagram videos.

On the iPhone/iPad, adjust the setting by going into your profile by tapping the speaker in the bottom corner. Tap gear/settings icon in the right corner to access your settings. Swipe down and tap Mute. Choose to always play with sound or to turn sound on and off with your ringer switch.

5-dotsOn your Android, adjust the settings by going to your profile page and tapping the speaker icon in the bottom corner. Tap the three vertical dots icon in the top-right corner.

Swipe down to the sound setting. Tap the setting to turn the sound on or off.

If the sound is off you can turn it on for individual videos simply by tapping the top right of the

You’re already using Instagram photo to share images. Now you can use Instagram to create videos to share. Instagram is a fun and creative way to freely share what is happening in your life and business.

The Vine Way – How to Use this Popular App for Video Marketing

Vine

Vine is a mobile service that lets you create and share short looping videos. The Posts on Vine are short little windows showing the lives of people, the settings, ideas and objects you find in your life every day. They can be fun and quirky or seriously businesslike.

Vine is a part of Twitter, so using the app is easy and free to install. It lets you instantly post your videos on Vine and quickly share to Facebook, Twitter and many other social media sites. Any videos you post to Vine appears on your profile and in your followers’ timelines.

You can find, follow and interact with others on Vine while exploring trending posts, editor’s picks and featured hashtags.

Install App

2-deviceInstalling the Vine app to your mobile device is easy to do. Go to Vine.co and click on the “Get it on Google Play” for android devices or “Download on the App Store” for iOS devices.

You’re taken to the Permissions page where you see what the app has access to. Choose your device from the list. Any devices you own show up here. Click ”Install”.

You have just installed Vine to your device.

Getting Started

Now that you have it installed on your device, sign in with your Twitter account or you can use an email address.

If you use an email address you will need to enter your name, the email address and a password.

If you sign up with Twitter, you will need to enter your name.

Now that you are logged in you can go to your feed of people your follow, activity of what you are doing, explore other people’s videos, or go to your profile.

Adding Video

To add video, tap the “Activity” tab. Your first time you open this, you won’t have any videos here. To create a video, tap the camera icon at the top of your menu bar.

7-video


Tap and hold the screen to record a normal 6 second video.

The 2 arrows at the bottom of your screen switches your camera from front to back.

Tap the grid option at the bottom to help frame your shot perfectly. The focus button (the target icon) lets you pinpoint an object in the frame.

The ghost icon allows Vine users to create stop-motion videos. Tap the ghost function and a small ghost shows in the last frame of your video and stays on the screen so you can perfectly line up you next shot according to where you left off.

4-options

When you upload a Vine video add a category by pressing the new button below the add location.

Marketing with Vine Tips

Vine tipsUse Vine to motivate your customers to contribute by reaching out to them and asking them to submit their ideas about a specific idea you give them.

Take advantage of Vine and Twitters alignment to show off your campaign hashtags, letting people know about new products or services.

Take people behind the scenes of your brand. Give them a chance to see the environment behind of your business. This works great for covering events and conferences you attend.

Put your product in motion. Vine’s stop-motion video function is perfect for showing off your product. For example, if you a food brand, make your food fun by playing with it or if your brand is fashion, play dress up with your products.

Give your customers a sneak peek of a giveaway item. Post a quick clip of what they could win in an upcoming giveaway you are promoting.

Finding People

Quickly find people you already know who are on Vine by using your device’s address book and on Twitter for the people you follow. You can search for people on Vine or invite others through text message or email to join you on Vine.

Tap the menu button at the top left corner of your Vine App. Select “Profile” and then tap on the two people at the top right corner.

Finding Posts to Follow

Use the Explore section to find videos on the Vine community. Tap the “Explore” icon at the top of your menu bar. You can choose either “Popular Now” or “On the Rise” posts, Vine Channels and Trending Tags. Select specific people or hashtags here as well.

5-channels

On the rise posts are recently uploaded posts that are getting a lot of shares.

Channels are particular categories that include art, comedy, cats, dogs, family food, health and fitness, nature, beauty and fashion, music, special effects, news and politics, sports, urban and weird.

Term to know: Revining– sharing other people’s posts with all of your followers in one simple tap.

Sharing

Vine posts can be shared to Twitter or Facebook from your profile settings. Add a Twitter account or Facebook account under the Social Networks tab.

To share a video you posted to Vine onto Twitter or Facebook, tap the Share button (it’s the arrow pointing up and to the right) shown under your post. Select Twitter or Facebook to share it along with a caption of some kind.

Sharing someone’s Vine post can be done as long as the user hasn’t protected their posts from being shared.

Embed Vine Post

A public Vine post can be embedded on your website.  Tap the “Share” button below the Vine post. Tap “Embed”. You will get an email with the embed link.

Security

Your posts will naturally be defaulted as public and can be viewed and shared by anyone on Vine. Vine allows set the protection your posts. You control who sees your posts, meaning only people you approve to follow you can see them. If you protect your posts, you are the only one who can share them to Twitter or Facebook.

To protect your post, go to your Profile tab. Select Settings and then Your Content. Check the Posts are protected button. This will apply to all your posts.

8-menu

More Tips

You must deliver a clear message within 6-seconds. Use time lapse to all the required elements of your story. Highlight your products or services in a smooth flowing clip.

Make every second count to show your personality. Show creativity, uniqueness and originality but be authentic.

Showcase your content by creating a video teaser for a new eBook, blog post or book. Include visual elements that visually showcase your product and engage viewers.

Vine is an excellent mobile service to add to your video marketing plan. It lets you create and share short looping videos. The Posts on Vine are short little windows showing the lives of people, the settings, ideas and objects you find in your life every day. The videos can be fun and quirky or seriously businesslike.

The 4 Big Don’ts You Need to Avoid When Using Audio and Video Content

video

Using audio and video on your site can greatly enhance your visitors’ experience.  It gives them alternative ways to receive information and makes your site more interesting.  But it is important not to push these mediums on your visitors, because it may actually be a turnoff for some.  Here are some things to look out for:

1. Try to avoid using audio or video that automatically starts when a visitor arrives at your site.  Most people want the power to choose when they watch video or listen to audio on the web, and if that is taken away, it could leave a bad taste in their mouths.

2. If you’re embedding videos, don’t put too many on any one page.  This can cause slow load times, and possibly even browser crashes for users who do not have the fastest connections or the newest computers.

3. Don’t take a “one size fits all” approach.  If you’re streaming audio or video, offer options for those with slower connections alongside the standard options. You can provide written summaries for recorded content, for example.

4. Don’t forget to seek input from your website’s visitors.  If you’re considering audio or video but have not implemented them yet, consider doing a user survey to find out how they would like to see it used.  If you are already utilizing audio and video, ask them if they feel you are using it in the best way possible.  You’re providing these things for the benefit of your users, so it’s crucial to make sure that they are in fact benefiting from them.

It’s important not to alienate anyone through your use of audio and video.  The idea is to give your users more options, not to make things more complex or decrease usability.

How to Incorporate Video to Your Marketing Strategy

3-videoOnline video’s popularity has grown exponentially in a short time, thanks to video sharing sites such as YouTube.  The increasing availability of high-speed Internet has also had a hand in making video so popular, there’s absolutely no doubt about it. More than 1 billion unique users each month to the site shows us we need to pay attention. Add to that, including video on your website can greatly enhance your visitors’ experience.

Live streaming video is a great tool for online tutors and others who can benefit from a high level of interaction with their visitors or customers.  It makes it possible for you to communicate in real time, do live demonstrations, and answer questions with ease.  For your audience, it’s the next best thing to being there with you.

Recorded video can also be a tremendous asset to your website.  It’s much easier than you might think to make professional-looking videos to showcase your products and services.  Your site visitors can watch these videos at their convenience, and if they like them they will often recommend them to friends and colleagues.  For added exposure, you could make your videos available for embedding with YouTube or another video sharing service.

Ways to Use Video

Video is a very versatile medium, and it can be used in a number of ways.  Here are some ideas:

* Make viral videos.  These are usually entertaining clips that include a plug for your business and appeal to a broad audience.  As a promotional method, viral video is not usually very targeted, but it can result in a huge amount of exposure at a relatively low cost.

* Hold online video conferences.  These provide an unparalleled way to reach out to your target audience. You can use tools like Google+ Hangouts to easily hold your online events.

* Make how-to videos. Create them on topics relevant to your website’s subject matter.  Providing informative video content will generate buzz about your website, potentially resulting in an increase in traffic.  It will also help you establish yourself as an expert.

The Advantages and Disadvantages of Video Sharing Sites

 stop sign

YouTube site makes it easy for anyone to upload videos to share with anyone with a computer who cares to watch them, and it provides viewers with a wealth of entertainment and education opportunities. It’s easy to do with a mobile phone, from your computer or just about any device. Sharing your videos on YouTube and other sites definitely has some advantages.

YouTube’s immense popularity can potentially result in lots of people viewing your videos.  If they find videos they like, they can embed them onto their own sites or blogs.  That will result in an even greater audience, and some of them may choose to embed your video on their sites as well.  You can see why some marketers love the idea of video sharing.

There are, however, some disadvantages to putting your videos on sites such as YouTube as well.  One of the biggest concerns of marketers is that video sharing doesn’t require users to come to your site to view the videos.  That means that while your videos may be wildly popular, they might result in very little traffic to your site.  It’s important to give viewers an incentive to visit your site once they are finished watching the video. Alternatively, you can change your videos’ settings so that they can’t be viewed on the YouTube site or embedded elsewhere, but that will limit your viewership.

Make sure you use YouTube’s handy tools to include promotions in your videos, clickable links and more. This will help bring more of your YouTube watchers back to your own site.

The sheer power and excellent features of YouTube likely outweigh and concerns you might have.

Embedding Video from Your Own Server

Video1

Those who do not like the idea of uploading their videos to sites such as YouTube can upload them to their servers and embed them from there.  This gives you more control over your videos and ensures there is no “YouTube” logo on your videos.

But before you jump into that, it’s important to remember that video files are usually very large.  Making them available directly from your server can take up valuable file storage space, and it can also drain your bandwidth.  When you upload videos to a video sharing site and embed them from there, you use that site’s storage space and bandwidth.

Whether you should upload video to a video sharing site and embed from there or keep it on your own server depends on several factors.  If you don’t mind having another website’s name pasted on your videos and don’t want to overtax your server, video sharing could be the best option.  But if you want to ensure that users have to come to your site to see your videos and prefer not to provide free advertising for a video sharing site, hosting your own videos might be the best way to go.

Hosting a Google+ Hangout on Air Tips

1-home

Hangout on Air is a way to record and share your discussions live and have them be replayed over and over again. Google Hangout on Air works with YouTube to stream your hangout live. It allows you to invite customers, friends or whoever to your public forum.

How Hangouts on Air Work

You’ll need to sign in to your Google+ account to begin with. Then go to the Home menu located on the left side of your screen. Scroll down and Click the “Hangouts on Air.”

 2-home tab

Click the “Start a Hangout on Air” button.

Here, Google+ asks you to connect to your YouTube account.

Verify your YouTube account by entering your phone number and using the verification code you receive.

3-youtube

Next you need to go back to the Google Hangout on Air screen and confirm YouTube and your Google plus accounts are connected.

Starting Your Hangout on Air

Give your Hangout a name and invite people to view it. The name you use here will be the title of the Hangout post in your Google+ stream and your YouTube recording. It cannot be changed in Hangouts after you set. It can be adjusted in the resulting YouTube video later though.

6-starting

You can invite people from your circles or individuals. Extended circles or the public cannot be invited to join the broadcast as a participant.

Agree to the Terms. Click the start broadcast button on the right and confirm you want to broadcast your hangout publicly.

4-publicly

Your broadcast has now started. When you are finished, simply click the End Broadcast button to stop the broadcast. Once the broadcast is done, it is automatically converted to a static video on YouTube where people can watch it and comment on it whenever they want.

Finding your Video

Your Hangout on Air video is available on your Google+ home page. Once the Hangout is finished, the video is automatically posted publicly to your YouTube channel as well as any other live streams you have, such as embedded links on your website.

You can edit your Hangout on Air video using YouTube’s video editor. Or download it and use your own editing software like Camtasia.

The easiest way for people to find your recorded broadcast is to create a page on your blog with the embedded video stream. You can embed the live player of your Hangout on Air by copying the YouTube URL or HTML code and pasting it onto your blog page.

There is some processing time. It can take a few minutes or several hours.

Preview your recording once it is done processing. Play it from start to finish and pay close attention to the beginning and ending. You can add tags, change the view from public to private, and add thumbnails or other things. You do this by clicking on the title of the video in the video manger, clicking on edit video or edit settings.

Tips for a Successful Google+ Hangout on Air

* Send out reminders close to the time your event is taking place. Promote it in advance as much as possible. Use your social media accounts like Facebook, Twitter and your newsletters to let people know about your hangout.

* Prepare in advance for your broadcast. It’s a live event. You won’t be able to make any edits until after the event. Have some type of script or bullet points worked out ahead of time.

* Grab the code from the embed code button before you start the broadcast. You will see a link that says “Embed”. Click it and you’ll get the code you can share.

5-embed

…and place it on your blog to send people to your Hangout on Air. This embeds the YouTube player on your site so visitors can watch the Hangout on Air live from your site as well as on Google+ and your YouTube channel.

* Highlight Reel. A few days after the event, post a short 1 or 2 minute highlight reel of the best moments from you hangout on your website, Google+ page, Facebook, Twitter and in any of your marketing. This is great for getting people who didn’t come to your last Hangout to attend your next one.

* Use the Q&A App. There is a Q&A app that you can use that will allow people to submit questions to your Hangout. This handy app also lets you keep track of questions you’ve already answered. NOTE: You have to start Q&A before your broadcast begins. You won’t be able to turn it on after you start.

7-qa

* Add Your Name and Website to Your Video Screen. The Google Toolbox app makes it possible to add your name, location and other details like your website to the video screen.

8-hangout-toolbox

It’s the “Lower Third” option. All you have to do is enter your information once and then have the app save the preset, so you can use it again.

 9-lower-third

Practice Ahead of Time

Check your settings so you maintain screen control during the broadcast. You can do this by going to the settings in the hangout and adjusting them to what you want.

* Make sure your environment is clear. What will people see and hear on your end? Keep distractions to a limit if possible.

* Have a conversation. Invite someone to be a guest and join in the conversation with you. It’s much more interesting to listen to a conversation than to a single person. Remember, however, that only 10 people are allowed on the Hangout on Air at a time but an unlimited number of people can watch.

Google+ Hangouts on Air is a lot like Skype. You can have conversations, text chats and record your discussions. The one thing that HOA has is the ability to share your recordings through YouTube and on your own website.

Google+ Hangouts: The Next Best Thing


hangouts

Hangouts are essentially video conferences, but with a casual twist. Google+ named it “hangouts” to give it a spontaneous feel. All you need to do is click “Hangout,” invite a few friends and you can just hang out on video. If other friends see your hangout in their feeds, they can join and hang out as well.

Of course even though the primary positioning is casual video chat, you can also use the technology for business meetings, conferences, brainstorming and one on one chats.

Here’s how to use Google+ hangouts.


STEP 1: GO TO HANGOUTS

Check out your Hangouts on the right of your screen.

1 - Hangouts

STEP 2: CLICK “NEW HANGOUT”

Click on “New Hangout” on the top of your Hangouts box.

2 - New Hangout

STEP 3: ADD OR REMOVE PEOPLE

Click the “x” button in the upper right corner of any circle to remove the circle. Check the box next to any other person or circle to open the hangout to more people.

3 - Add-or-remove-pics

STEP 4: START THE HANGOUT!

Once you’ve told Google who you want to hang out with, click the little video camera icon to get started!

4 - Start-Hangout

You’ll immediately see a screen with anyone else in the hangout, along with your own video so you can see how you look.


STEP 5: INVITING MORE PEOPLE

If you’re in the middle of a hangout and want to invite more people, just click on “Invite.”

5 - Invite-more-people
You’ll then be taken to the invite screen where you can invite more people to your hangout.

6 - Invite-screen

STEP 6: TEXT CHAT

Sometimes you’ll want to use text chat in addition to video chat. For example, if someone wants to share a link to something online, it’s a lot easier to just paste the link in a text chat rather than spell it out in video.

To access the text chat, click “Chat.”

7 - Chat

Then use the chat box like any other chat room box.

8 - Group-chat

STEP 7: SHARING YOUTUBE VIDEOS

Hangouts makes it very easy to share videos. You essentially have one group “channel” that everyone can watch at the same time. Anyone can set the video that the player is set to and everyone else in the video can watch the same video at the same time.

To share or watch a video, click “YouTube.”

9 - YouTube

You can choose videos from your playlists or search from YouTube videos. You can also create and save a playlist together! If you want to talk during the video, just click “Push to talk”.

10 - YouTube-box

STEP 8: OTHER SETTINGS

To mute your video or audio, click either of the mute buttons in the lower right corner. These are useful for if you need to step away from your video for a few minutes, if one person is speaking or if your dog’s barking in the background.

11 - Other-settings

To access additional microphone and video settings, click “Settings.”

12 - Other-settings-box

Here you can set your microphone and camera. You can test the various settings to make sure everything’s working properly.

That’s how to use hangouts. You’ve just learned how to start a new hangout, how to set who the hangout is open to, how to invite more people, how to use the text chat, how to share YouTube videos and how to set your microphone and video settings.

Hangouts really takes connecting with friends online to the next level. Instead of just sharing casual, spontaneous status updates, you can now share entire social interactions spontaneously.


Getting Started With Sony Vegas


video6

Sony Vegas is an all-purpose industrial grade video editor. It runs extremely fast and has a wide variety of export formats. It’s relatively easy to learn (compared to FinalCut or Adobe Premier.) If your main purpose is editing simple web videos or DVDs, you can learn everything you need to know about Vegas in under a week.

Its only drawback is that it lacks sound editing, which needs to be done in external software like Audacity. It doesn’t have many special-effects type of filters and is primarily a video editing program, not a motion graphics program.

All that said, Sony Vegas is a great all around pick for video editing. Here’s a basic guide to using Sony Vegas.


Step 1: Understanding the Interface

A good understanding of Vegas’ interface is imperative for being able to edit efficiently. Here’s the basic layout of Vegas’ interface.

1-Layout-Guide

1) Media Box. This is where you can view your existing media, add new media, manage transitions or effects.

2) Volume Bar. This is where you adjust how loud or quiet the volume is. It also allows you to watch the sound levels visually while previewing a video.

3) Toolbar. Select what kind of tools you’re using to edit your video.

4) Preview Box. Play the video and see how it’ll look after it’s rendered in this box.

5) Timeline. Move forwards and backwards in time in your video. This is where the majority of your editing work will take place.


Step 2: Importing Media

In order to edit video, you first need to import video into Vegas. Do this by browsing for media either in Windows Explorer, or in Vegas’ built in explorer.

2-Importing-Media

Anytime you see a video you want to import, just drag and drop it into the timeline. This works from both Windows Explorer and Vegas’ explorer.


Step 3: Navigating the Timeline

Editing involves constantly moving forwards and backwards in time, previewing how the video looks like, making changes and repeating the process. In order to edit well, you need to be very comfortable with moving through video.

Here’s how to navigate Sony Vegas’ timeline.

3-Navigating-Timeline

1) Basic Controls. This is how you Play, Stop and Pause video. You can also “Play from Start,” “Skip to End” or “Skip” to Beginning” with these controls.

2) Selection. You can select areas of video to apply effects to, to render or to cut. The area between the yellow triangles is the area that’s selected. Change your selection by dragging the yellow triangles.

3) Cursor. Your cursor determines where playback starts and stops. As you play your video, the cursor will move along showing you where in the timeline you’re currently at. Simply click anywhere on the timeline to move the cursor.

4) Playback Rate. You’ll often want to play your video faster or slower than normal. This will allow you to speed past parts that you don’t need to edit, or drastically slow down parts you want to edit so you can get to a specific frame. The Playback Rate allows you to adjust this speed.

It’ll really make your life easier to learn three keyboard shortcuts. These three shortcuts are:

J      K     L


J – Play backwards.

K – Pause.

L – Play forwards.

Double Tap J – Play backwards at double speed.

Double Tap L – Play forwards at double speed.

Triple Tap L: Play forwards at quadruple speed.


You’ll find yourself playing video forwards and backwards constantly throughout the editing process. Learning just these three keys will cut hours from your editing time.


Step 4: Basic Editing: Moving Clips Around

Now that you know how to navigate the timeline, let’s get into how you actually edit video.

To move video around, simply click and drag a video clip. For example, if you’re starting with this video clip:

4-Drag-Original

If you dragged the right clip to the right, it would look like this:

5-Drag-to-the-Right

If you dragged it to the left, so that it overlaps the first video, Vegas will automatically create a transition called a crossfade. Basically, the two videos would fade into each other, giving it a smooth transition from one clip to another:

6-Drag-Crossfade


Step 5: Basic Editing: Splitting Clips

Let’s say you take a 20 minute long video on your iPhone. In that 20 minute clip are 5 sub-clips that you want to edit separately, put transitions between, apply different effects to, etc. In order to do that, you’ll first need to split that one clip into several separate clips.

First, position your cursor where you want to make the split.

7-Position-Cursor

Then either go to Edit > Split or just hit S on your keyboard. The clip will then be split where your cursor was positioned.

8-Split-Video

Step 6: Basic Editing: Adding Text, Backgrounds and Other Media

Often times you’ll want to add in things that aren’t already there in your video clips. For example, subtitles, text transitions, colored backgrounds, special effects and so on.

To do this, first navigate to the Media Box in the upper left corner. In the bottom tabs, click on the tab most appropriate to the media you want to create. For example, if you wanted to create text, you’d click on Media Generator, then Text.

9-Generate-Text

Drag and drop the text style you want onto your timeline. When you do, a text edit box will pop up.

10-Text-Edit-Box

Edit the text to look the way you want it to. The changes will automatically be saved.

The same can be repeated for special effects by going to the “Video FX” tab. Transitions can be inserted by going to the “Transitions” tab. Transitions must be dragged and dropped onto overlapping video.


Step 7: Using the Video Preview Tool

To see how your video will look when it’s finally rendered, use the video preview tool in the upper right corner.

You can change the resolution of the video by clicking the drop-down menu. By default, Vegas uses “Preview (Auto)” to save memory and processing power. If you need better quality previews, change the quality.

11-Preview-Box

To see the video preview in a larger screen mode, just drag the video out to the center, drag the corners to enlarge it and set the display mode to “Full” or “Half.”


Step 8: Rendering Video

Once you’ve finished editing your video, it’s time to take your edits and turn it into a real video file. The process is called rendering. During this process, it helps a lot to turn off other programs, as it’s very processing intensive. If you have a particularly long video, you may have to render overnight.

To start rendering, go to File > Render As.

12-Render-As

The “Render As…” box will pop up, with a number of options.

13-Render-Box

First, name your file in #1.

Tell Vegas whether to render the whole file, or just your selection in #2.

You can change the render template by selecting from one of the many selections in #3. These templates are generally all high resolution renders, meaning you’ll have files in the gigabytes, not the megabytes, even for short videos.

This is great for DVD-quality work. If you’re working with DVDs, it’s as simple as selecting the format you need to burn the DVD in and choosing that template.

However, if you’re editing for web, you’ll need to customize your renders. Generally speaking, you’ll want to render out a small sized video that’s highly compressed with decent quality for web work (i.e. YouTube, Vimeo, etc.)

To do this, click Custom, then click Video. Select the Sony YUV Codec.

14-Render-for-Web

If you want to get into the technicalities of video editing, there’s a lot you can learn about compression, codecs and how videos are encoded. That knowledge comes in handy when selecting how you want to render your video.

For most people however, Sony’s YUV codec is more than adequate for web videos. The NTSC DV setting is a good choice for DVD editing.

Click “OK” when you’re finished.
Congratulations! You now know enough to do basic editing in Sony Vegas. You now know how to import media into Vegas and edit that media by splitting it up and moving it around. You’ve learned how to move through the timeline by positioning your cursor or playing the video at 2x or 4x speed. You learned how to create transitions, how to add text, how to add effects and other media. You’ve learned how to change the quality of the preview as you’re editing. Finally, you learned how to render a video in both DVD quality and web quality.